



What is a CRM to HubSpot migration checklist?
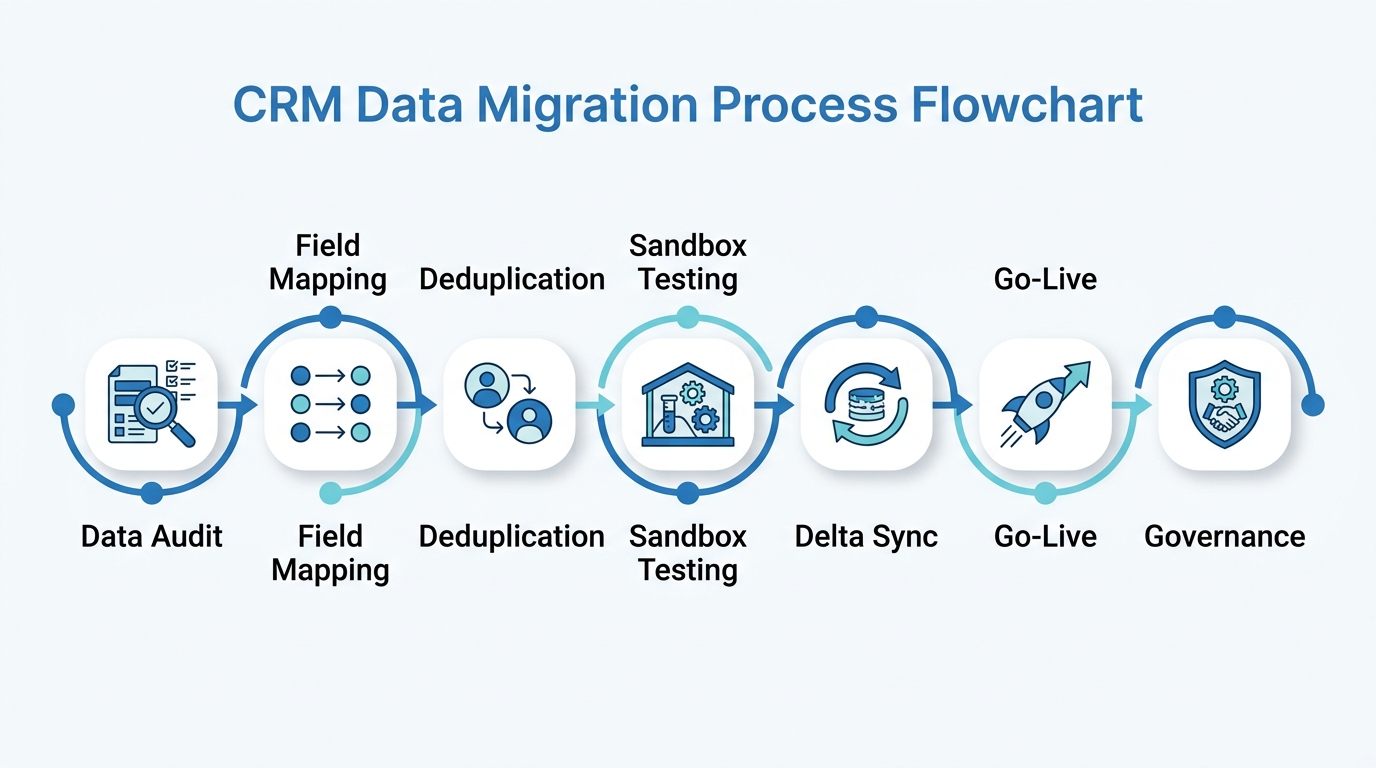
A CRM to HubSpot migration checklist is a structured, phase-by-phase framework covering pre-migration data audit, field type mapping, deduplication, sandbox UAT, delta sync cutover, and post-migration data governance. It helps revenue operations teams move customer data, workflows, and automation from a legacy CRM into HubSpot while maintaining data integrity and user adoption.
A majority of CRM implementation projects run over budget, miss their go-live deadline, or result in data quality problems that persist for more than a year after launch. The pattern behind these failures is remarkably consistent: teams start the technical configuration work before completing the diagnostic work. They begin mapping fields before they know what fields exist. They attempt imports before they know how many records are duplicates.
This checklist is the playbook we use at Widelly to keep migrations on time and within budget. It applies to migrations from any source CRM, including Salesforce, Microsoft Dynamics 365, Zoho, and Pipedrive. Each phase includes the specific decisions, deliverables, and validation steps required before moving to the next. Our HubSpot migration services team uses this exact framework for every engagement.
- The 7-question pre-migration diagnostic that reveals the true scope of your migration before you commit to a plan
- Field type mapping rules with a transformation reference table for the most common data type mismatches
- A 3-pass deduplication protocol that targets the most common sources of duplicate records before any import begins
- Sandbox UAT methodology: a 50-record validation approach that catches edge cases before production
- The delta sync cutover protocol that closes the gap between your data export date and your go-live date
- A post-migration governance framework with both technical controls and organisational accountability mechanisms
Why Most CRM Migrations Run Over Budget
The failure pattern in CRM migrations is consistent across platforms and organisation sizes. Teams that exceed their budget and timeline tend to share one behaviour: they start building before they know what they are working with. They begin configuring pipelines before they understand what stages their deals actually use. They attempt imports before they know what percentage of their contacts are duplicates.
In our migration practice at Widelly, we have seen that skipping pre-migration diagnostic work tends to add significant remediation time downstream. This pattern is not unique to any particular source CRM. It appears in Salesforce migrations, Zoho migrations, Dynamics migrations, and migrations from custom legacy platforms.
The organisations that complete migrations on schedule consistently invest 2 full weeks in the data audit before writing a single configuration. That investment pays for itself within the first week of the mapping phase, when field mapping decisions are based on actual data rather than assumptions about what the data looks like. Research from leading technology analyst firms consistently shows that organisations using a structured migration methodology are significantly more likely to complete within their original timeline and budget.
Widelly’s HubSpot consulting and strategy services can help you plan a migration that avoids the most common failure modes.
Phase 01: The 7-Question Pre-Migration Data Diagnostic
The pre-migration data audit answers seven specific questions. Each answer directly drives decisions in the phases that follow. Skipping any of the seven creates a knowledge gap that tends to surface as a more expensive problem in a later phase.
Ready to Plan Your CRM Migration?
Our certified migration specialists can assess your CRM environment and produce a detailed scope within 5 business days.
Phase 02: Field Mapping and Type-Safe Schema Design
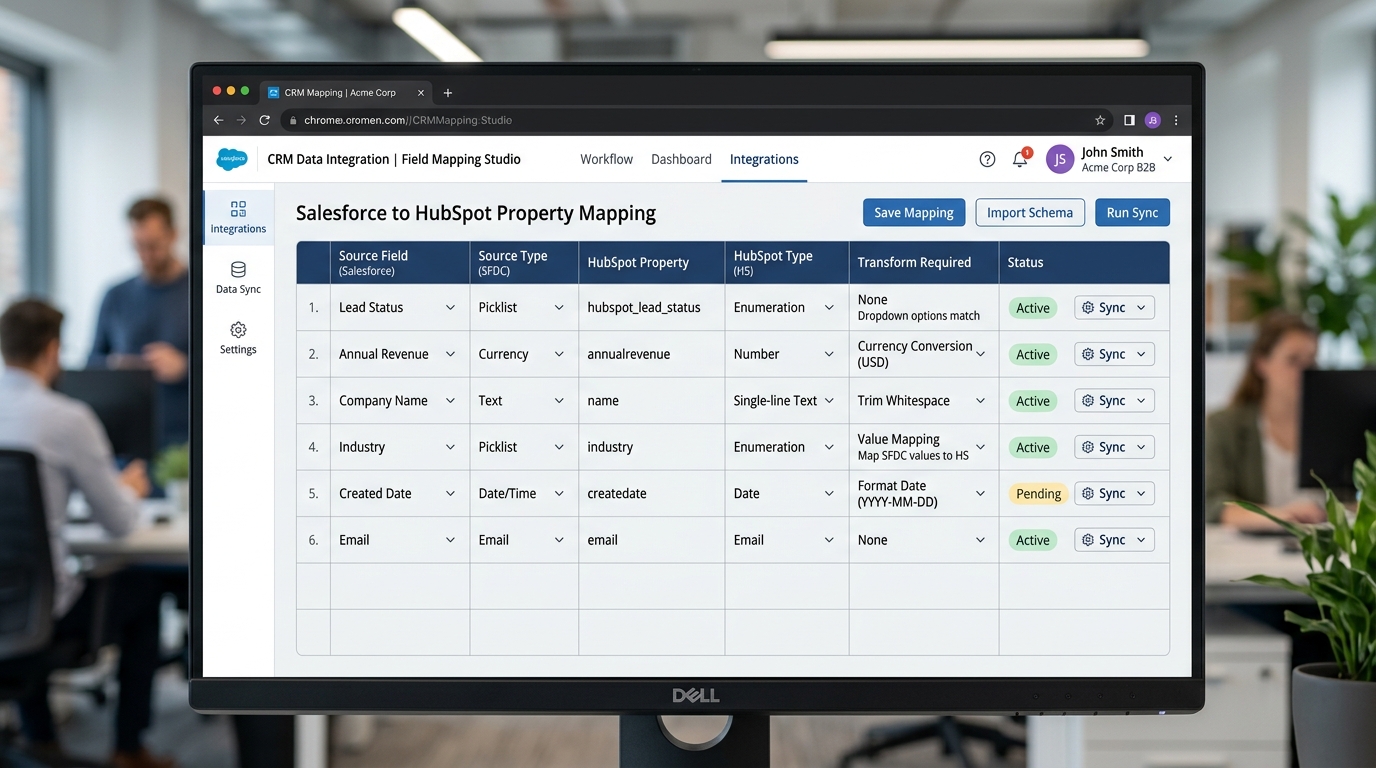
Field mapping is where the most consequential technical decisions are made. The errors that cause the most damage are field type mismatches: a picklist field mapped to a free-text property, a currency amount imported as a formatted string, a date imported without timezone normalisation.
The fundamental principle: every field type in your source CRM must map to a HubSpot property of the correct equivalent type. Type mismatches do not always produce visible import errors. Some create silent data corruption, where the value imports successfully but is stored in the wrong type, breaking workflow filters, list segments, and reports that reference that field.
| Source Field Type | HubSpot Property Type | Common Mapping Error | Correct Handling |
|---|---|---|---|
| Picklist / Option Set | Dropdown Select | Mapping to Single-line text breaks segmentation filters | Create Dropdown Select with approved values before import; normalise all picklist values to match |
| Currency (formatted) | Number | Strings like ‘$1,250,000’ import as text, breaking deal reports | Strip $ and commas; convert K/M notation to full integers in pre-import script |
| Boolean (string) | Checkbox (true/false) | ‘true’/’false’ strings not recognised as booleans | Replace with uppercase TRUE/FALSE or numeric 1/0 in CSV before import |
| Datetime (local timezone) | Date (UTC) | Off-by-hours timestamps affect SLA reports and activity chronology | Convert all datetimes to UTC in pre-import script |
| Free-text (unconstrained) | Dropdown Select | Free-text values fail validation against constrained dropdown options | Normalise the most common values to approved options; tag remainder as ‘Other’ |
The HubSpot property type documentation is the definitive reference for how each property type handles incoming data. The Field Mapping Dictionary you produce in this phase should be reviewed by a sales manager and a marketing manager, not just the RevOps or IT team. The people who use these fields daily understand their nuances better than anyone reviewing a data schema in isolation.
Phase 03: The 3-Pass Deduplication Protocol
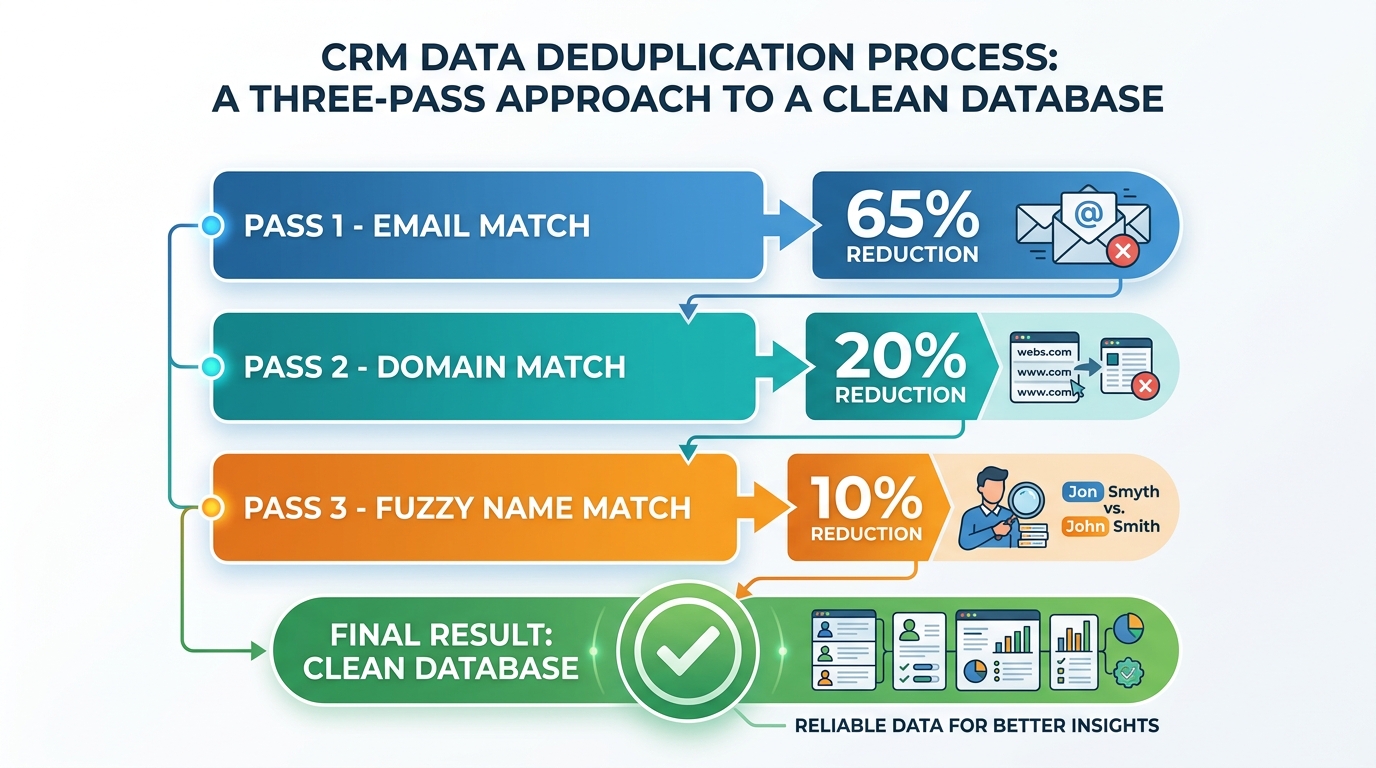
Deduplication before import is the single most important quality gate in the migration process. The impact of skipping it is straightforward: a 22% duplicate rate on a 50,000-record database means approximately 11,000 duplicate contacts in HubSpot from day one. Lead scores split across records. Marketing emails potentially fire twice to the same person. Sales reps find two records for the same prospect and arbitrarily choose one, making the other record’s activity history invisible.
Pass 01, Exact email match: Group all contact records by primary email address. Any group containing two or more records represents one person with multiple records. Merge to a single record: keep the oldest creation date, take the most recently updated value for each property, concatenate all activity history in chronological order. This pass typically eliminates the majority of duplicates.
Pass 02, Company domain match: For company and account records, group by root domain after stripping subdomains and protocol prefixes. ‘enterprise.acmecorp.com’ and ‘acmecorp.co.uk’ both resolve to ‘acmecorp’. Treat them as the same company unless a manual review confirms a legitimate business reason for separate records.
Pass 03, Fuzzy name and phone match: Run similarity scoring on first name, last name, and phone number for contacts not resolved by Passes 01 and 02. Flag pairs scoring above 85% similarity for manual human review. Do not auto-merge on name alone. Common names produce false positives at scale, and a wrongly merged contact cannot be unmerged without significant data recovery effort.
After go-live, use HubSpot’s native duplicate management tool for ongoing duplicate prevention as part of your monthly governance review.
Phase 04: Sandbox Testing and the 50-Record Validation
We run a sandbox import before any data touches the production HubSpot portal on every migration we manage. The sandbox is where we discover the edge cases that field mapping documentation cannot anticipate: a contact whose email address contains an unusual character that causes the importer to reject the row, a deal amount stored in European decimal notation that gets misinterpreted, a historical timestamp that falls outside the accepted import date range.
Organisations that run a sample validation in sandbox before production import tend to discover data issues that were not visible in the field mapping documentation. Discovering those issues in sandbox typically takes under an hour. The same issues found in production after go-live can take days of cleanup and recovery.
The 50-record validation protocol: select 50 records at random from your import CSV, including records with unusual property combinations, older creation dates, and contacts associated to multiple companies. Import them to HubSpot sandbox. Open each record and compare it field by field to its source CRM counterpart. Verify: every property contains the expected value; contacts are associated to their correct companies and deals; activity records are timestamped correctly; lifecycle stages are set according to your Phase 02 mapping.
UAT sign-off from both a sales manager and a marketing manager is a hard gate before Phase 05. No exceptions.
Migrating from Salesforce, Dynamics, or Zoho?
We have managed migrations from all major source CRM types. See our source-specific guides and get a tailored scope.
Phase 05: The Delta Sync Cutover Protocol
The delta sync cutover is the phase that teams most commonly underplan and the most frequent source of go-live day emergencies. Between the initial export date and go-live, the source CRM keeps accumulating new records, deal updates, and activities. Without a structured delta sync plan, everything created during this gap is missing from HubSpot on day one.
Phase 06: Post-Migration Data Governance That Prevents Regression
Data governance determines whether your HubSpot instance remains clean and trustworthy or degrades back toward the fragmented data environment that drove the migration decision. Without active governance controls from day one, the patterns that caused the original data quality problems, such as free-text entry in picklist fields, duplicate record creation, and missing required properties on deals, tend to reappear within 60 to 90 days of launch.
| Governance Control | Technical Implementation | What It Prevents | Review Cadence |
|---|---|---|---|
| Property creation restricted to Super Admins | HubSpot Settings > Users: limit property creation to Super Admins only | Property sprawl: dozens of duplicate fields accumulating within months of launch | Per request |
| Required properties on deal stage advancement | Configure in HubSpot Pipeline settings per stage | Deals advancing without close date, amount, or next steps, breaking forecast accuracy | Weekly pipeline review |
| Dropdown Select for constrained value fields | Set property type on creation; no free-text alternative available | Free-text contamination breaking segmentation filters and workflow enrollment | Monthly audit |
| Duplicate detection on contact creation | Enable via HubSpot deduplication settings | Duplicate rate climbing back above acceptable levels within 12 months of launch | Monthly scorecard |
| Monthly RevOps Governance Board | Standing 60-minute monthly meeting: RevOps, sales rep, marketing rep | Silent data quality regression without organisational visibility or accountability | Monthly |
Widelly’s revenue operations advisory services include post-migration governance setup and quarterly data quality reviews.
How Long Does a CRM Migration Take? Realistic Timelines by Complexity
Timeline depends on four variables: total record volume, data quality, integration count, and whether custom automation code needs to be re-architected for HubSpot.
| Organisation Profile | Typical Record Volume | Integration Complexity | Realistic Timeline |
|---|---|---|---|
| SMB with clean data | Under 20,000 records | 3 or fewer integrations | 4 to 6 weeks |
| Mid-market with moderate complexity | 20,000 to 150,000 records | 4 to 8 integrations | 6 to 10 weeks |
| Growth-stage with custom objects | 150,000 to 500,000 records | Custom objects and API integrations | 10 to 16 weeks |
| Enterprise with complex automation | 500,000+ records | 20+ integrations, legacy automation code | 16 to 24 weeks |
The single variable that most extends timelines is data quality discovered during Phase 01. A database with high duplicate rates requires a dedicated deduplication sprint that adds weeks to the schedule before any HubSpot import work begins. Organisations that invest in data quality improvements before the migration decision consistently complete in the shorter end of these ranges. See our CRM implementation and migration overview for engagement options.
Frequently Asked Questions
What is a CRM to HubSpot migration checklist?
A CRM to HubSpot migration checklist is a structured, phase-by-phase framework that guides revenue operations teams through every decision required to move customer data, automation logic, and user workflows from a legacy CRM into HubSpot. It covers the complete lifecycle: pre-migration data audit, field type mapping and schema design, deduplication, sandbox user acceptance testing, delta sync cutover, and post-migration data governance.
The purpose is to enforce the correct sequence of work. Skipping diagnostic phases (the data audit and field mapping) before starting technical phases (the import and configuration) is the most common cause of migration projects running over budget and over timeline. A checklist ensures that each phase completes and validates before the next begins, creating a series of quality gates that catch problems while they are still inexpensive to fix.
Our HubSpot migration services team uses this framework for every engagement, regardless of source CRM.
How long does a CRM to HubSpot migration typically take?
The timeline varies based on record volume, data quality, integration count, and automation complexity. SMB organisations with clean data and few integrations can complete in 4 to 6 weeks. Mid-market organisations with moderate complexity typically need 6 to 10 weeks. Enterprise organisations with custom automation code, large record volumes, and extensive integration dependencies should plan for 12 to 24 weeks.
The variable that most extends timelines is data quality. A database with a high duplicate rate requires a dedicated deduplication sprint before any HubSpot import work begins, adding weeks to the schedule. Organisations that address data quality proactively, before the formal migration project starts, consistently complete in the shorter end of these ranges.
Contact us for a realistic timeline estimate based on your specific environment.
What data can be migrated from any CRM to HubSpot?
The following data types can be migrated from virtually any source CRM: contacts and leads with all standard and custom properties, companies and accounts with firmographic data, deals and opportunities with pipeline stages and amounts, and activity history including calls, tasks, meetings, and notes.
What does not migrate natively includes email engagement metrics from external platforms (open rates, click rates tracked in other tools), proprietary automation code specific to the source platform (such as compiled server-side triggers or platform-specific scripting languages), and custom UI components built for the source CRM. These require re-architecture rather than data migration. See the HubSpot import documentation for the full technical reference on supported import formats and field types.
What is the biggest risk in a CRM to HubSpot migration?
The single highest-risk moment is the delta sync cutover: the gap between the date of the initial data export and the date the organisation goes live on HubSpot. During this window, typically 4 to 8 weeks, two things happen simultaneously: your team is cleaning and testing data for HubSpot, while the source CRM keeps accumulating new contacts, deal updates, and activities from the live sales team.
Without a structured delta sync protocol, everything created in the source CRM during this gap is missing from HubSpot on day one. The mitigation is to redirect all new lead creation to HubSpot 48 hours before the final cutover, pull a final delta export from the source CRM, and import that delta as the last batch. The second highest-risk element is insufficient sandbox testing. See HubSpot sandbox documentation for setup instructions.
How do we maintain data quality after go-live?
Post-migration data quality requires both technical controls and organisational accountability. The technical controls: restrict custom property creation to Super Admins to prevent property sprawl, configure Required Properties on key deal stages to ensure forecast data completeness, enable duplicate detection to catch new duplicates before they accumulate, and use Dropdown Select property types for any field that should have constrained values.
The organisational mechanism is a monthly RevOps Governance Board: a 60-minute meeting with RevOps, sales, and marketing representatives reviewing a data quality scorecard and managing configuration change requests. Without this combination of technical controls and human review, the patterns that caused the original data quality problems tend to reappear within months of launch. Our revenue operations advisory includes governance setup and quarterly reviews.
Can we migrate without the sales team losing productivity?
A properly executed migration can be designed to minimise sales team disruption. The most effective approach is a parallel run: the sales team begins logging activities in HubSpot approximately one week before the hard cutover, while still managing their active pipeline in the source CRM. This builds familiarity with HubSpot before it becomes the only system.
Timing the hard cutover for a weekend event means reps arrive Monday to find their complete pipeline, historical activities, and open tasks in HubSpot with no gaps. Role-specific training works best when kept to 90 minutes focused on the 6 to 8 tasks reps perform daily: looking up a contact, logging a call, updating a deal stage, booking a meeting, sending a tracked email, and creating a follow-up task. Advanced features can be introduced progressively after basic adoption is confirmed. Our HubSpot onboarding services include structured ramp programmes.
What if we discover data problems after going live?
Post-launch data issues are a normal part of migration complexity and do not indicate the migration has failed. The key is responding quickly and systematically. For duplicate records, use HubSpot’s Merge Duplicates tool. For large-scale problems, export the affected list, run a deduplication pass externally, and re-import using HubSpot’s update-existing-records mode keyed on record ID.
For property value problems such as rogue free-text in picklist fields or incorrect currency formats, export the affected property, clean values in a spreadsheet, and re-import. For broken workflow automation, check the workflow error log in HubSpot Automation. Most errors fall into three categories: enrollment criteria referencing a property value that no longer exists, action steps referencing a deleted user or template, and timing settings that need timezone recalibration. Our HubSpot consulting team is available for post-migration remediation if the scale exceeds internal capacity.
Do we need a certified partner for our CRM migration?
For straightforward migrations with clean data, standard field configurations, and teams with existing HubSpot experience, an experienced in-house RevOps team can manage the work successfully. HubSpot’s documentation and Academy resources are comprehensive, and many organisations manage their own migrations effectively.
The scenarios where a certified partner significantly reduces risk: complex data migrations from multiple source systems, migrations involving proprietary automation code that needs re-architecture, organisations without a dedicated RevOps function who need both delivery and knowledge transfer, and tight timelines where parallel workstream management is critical. Our HubSpot consulting and strategy team structures engagements to transfer knowledge to your internal team, not to create ongoing consultant dependency. See how we work for engagement models.
Need Expert Help With Your CRM Migration?
Our certified HubSpot specialists have deep migration experience across all major source CRM platforms. Get a tailored scope and timeline.
Conclusion
A CRM migration done with discipline is one of the highest-leverage operational investments a revenue organisation makes. The seven-phase framework in this guide enforces the correct sequence: audit before mapping, clean before importing, test before going live, govern after launching. Each phase builds on the previous one, and compressing or skipping any phase shifts the cost of the problems it would have prevented into a more expensive recovery phase downstream.
The B2B organisations that follow a structured migration methodology, including independent data audit, sandbox validation, and governance from day one, consistently reach go-live on schedule with clean data and strong early adoption. Those outcomes come from planning discipline, not technology complexity.
If you are planning a CRM migration and want to discuss your specific environment, our HubSpot migration services team offers a no-obligation scope assessment covering your data complexity, integration requirements, and realistic timeline. You can also explore our CRM implementation and migration overview for the full range of source CRM types we support, or visit our revenue operations advisory for ongoing strategic support after launch.
About the Author

Hamza
Healthcare Market Research and Business Development Specialist with a strong focus on pharmaceutical, biotech, and life sciences sectors. Experienced in analyzing market trends, competitive landscapes, and growth opportunities to support strategic decision-making. Skilled in transforming complex healthcare data into actionable insights that drive business expansion, partnerships, and revenue growth.
Related Articles

HubSpot vs Salesforce: Honest Comparison for B2B Companies
There is a conversation that happens roughly eight months after most CRM go lives, and…

HubSpot vs Microsoft Dynamics 365: Which CRM for B2B Growth?
Three different people read a Dynamics 365 versus HubSpot comparison for three different reasons, and…

How to Get Internal Buy-In for HubSpot: A Guide for Champions
You Are Convinced HubSpot Is Right – Now Convince Everyone Else You have evaluated HubSpot,…